Category Archives: Active Directory

Powershell Script to add home folder path in Windows 2003 AD on users in list of email addresses

So you need to assign and create home folders to a bunch of users and don´t really feel like doing it all the GUI way one by one?

I had this problem and I also needed to specify what users to create folders for by a list, and since email addresses are a good primary key I based my script on that.

This script will create folders, set permissions and update this information in the user objects in AD

First do Read

In Microsofts “How to assign a home folder to a user” you will find out how assign home folders in GUI or by scripting. When assigning a home folder in AD Users and Computers the AD takes care of creating the folder on specified share, but when assigning a home folder using the scripts they provide all you get is the path mapped in the users computer and in the AD user object, the folder is not created.

Then do Read

This script needs the path to a text file with the users email addresses** (one address per line), domain name,path to root of user share and a drive letter to the home folder (use a “high” one so you don´t get problems with card readers etc.).

** Can easily be changed to display name or samaccountname

! The script will set the users home folder name to “samaccountname_givenName-sn” (f ex. “jifr_Jimi-Friis”)


Powershell Script to add home folder path in Windows 2003 AD on users in list of email addresses

Script to add path to home folder in Windows 2003 AD

Then do Copy modify and enjoy! as always on your on risk 🙂

##***************************************************************************
## ***** Script Header *****

## File Name:  AD_getUserLogonName_fromList_CreateAndSetHomFolder.ps1
# Author : Jimi Friis, www.newsweb.se
# Created: 2012-06-05
#
# Purpose:  Set up home folder for Active Directory users specified as email adresses in a text file
# Continue reading Powershell Script to add home folder path in Windows 2003 AD on users in list of email addresses

Make sure that Group Policies can be updated over VPN

To make sure* that GPO´s are updated even for users that are connected over VPN you can disable the “Group Policy slow link detection”

GPO settings

In “User Configuration / Administrative Templates / System / Group Policy” **

open up the “Group Policy slow link detection”,

enable it and set the “Connections speed” to 0 (null). This  disables the slow link detection.

* For some GPO settings to update on a computer or a user (depending on what type of settings are used) the connection to the domain controller must be established before the computer boots or before the user are logged on to the computer.

** If the settings are Computer based then edit the  “Computer Configuration / Administrative Templates / System / Group Policy”, “Group Policy slow link detection”.

Outlook Anywhere settings from GPO

If you want to make sure all of your employees (ok, maybe not yours but you get it) have the right settings in their Outlook profile so that they can always use the mail client even when they are outside of the office, you should push these settings from a GPO.

Download Template

Download this file http://download.microsoft.com/download/F/B/C/FBC43645-89EA-4FB4-828C-DFE27C360233/article-961112.adm

Save the file temporary to your desktop or directly to %WinDir%inf

Set up the GPO

Open the GPMC and create a new group policy with an easy to understand name like “Outlook 2007 Anywhere”

Edit the GPO

Add the template to the “Outlook 2007 Anywhere” GPO

  1. Right click on “Administrative Templates” under User Configuration and chose “Add/remove Templates” from the drop down menu.
  2. Click “Add”

    and select the file named “article-961112.adm” (if you saved the file to the desktop just drag it in to this window) and Click “Open”
  3. Now that the template is added click “Close”

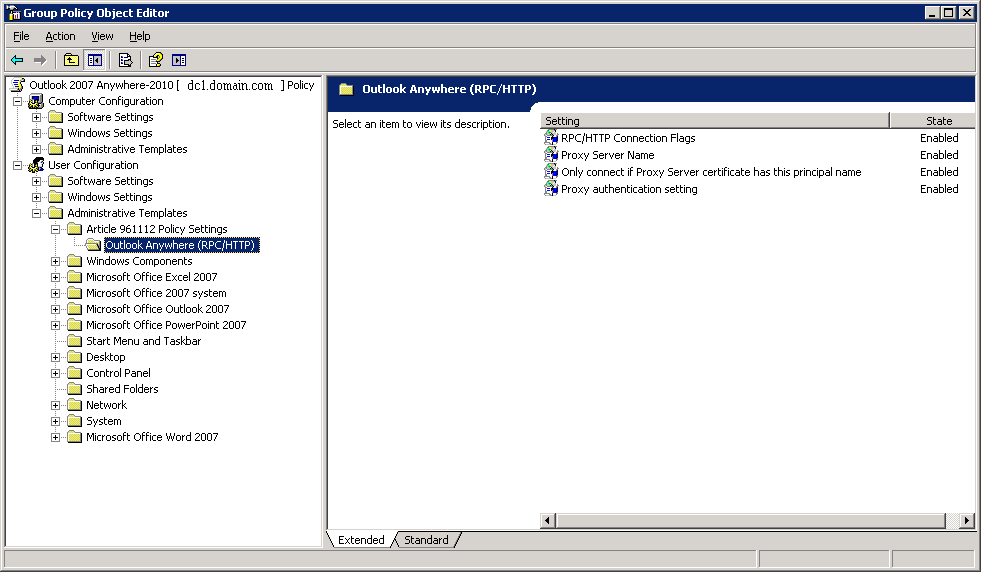
Configure the Outlook Anywhere template

Now open the added template and change the configuration to meet your needs.

  1. RPC/HTTP Connection Flags
    Enable the setting and pick the flags you need
    Flag1: Enables the ‘Connect to Microsoft Exchange using HTTP checkbox’ on the Connection tab.
    Flag2: Enables the ‘Connect using SSL only’ checkbox
    Flag3: Enables the ‘Only connect to proxy servers that have this principal name in their certificate’ checkbox
    Flag4: Enables the ‘On fast networks, connect using HTTP first, then connect using TCP/IP’ checkbox
    Flag5: is not implemented as an option in Outlook 2007 so it is not included in any policy settings.
    Flag6: Enables the ‘On slow networks, connect using HTTP first, then connect using TCP/IP’ checkbox
  2. Proxy Server Name
    Enable the setting and specify the server name, this should be your DNS MX record.
  3. Only connect if Proxy Server certificate has principal name
    Enable the setting and enter your certificates common name, if you have a wildcard certificate it will look like on the image but if you have a single server certificate it is probably the same as the DNS MX record.
  4. Proxy authentication setting
    Enable the setting and choose authentication type. This should be set to “NTLM authentiction”.

Now all you have to do is to link the GPO to the domain and wait for the replication and policy update times.
If you have users that are connected to the domain via VPN make sure that the GPO “Slow link detection” is configured to your meet needs.