Tag Archives: nodejs

How to run karma in TeamCity on Windows server

This is one solution and it works for us, there is also a node and npm plugin for TeamCity that I did not try, it is found here https://github.com/jonnyzzz/TeamCity.Node.

Setup nodejs, npm and karma for TeamCity on Windows server.

Install nodejs

Install nodejs for windows using the latest installer from https://nodejs.org/en/download/

Configure npm global

To be able to call karma and npm from TeamCity command line build step you need to
update the global catalogs for npm (as described in this post http://stackoverflow.com/questions/7300132/how-to-use-npm-with-node-exe/9366416#9366416)

Create the global (admin) location(s) for npm modules
“C:\ProgramData\npm-cache” – npm modules will go here
“C:\ProgramData\npm” – binary scripts for globally installed modules will go here
“C:\ProgramData\npm\node_modules” – globally installed modules will go here
And set the permissions appropriately
administrators: modify
authenticated users: read/execute

Run the following npm commands in a command prompt
npm config –global set prefix “C:\ProgramData\npm”
npm config –global set cache “C:\ProgramData\npm-cache”

Add npm and nodejs to your System’s Path environment variable

From the GUI, in “Control panel” search for “advanced system setings” open it and select “Environment variables” or run “sysdm.cpl” from cmd to open the “System Properties”
Add the following to PATH: “;C:\Program Files\nodejs\;C:\ProgramData\npm”

Install karma-cli in “C:\ProgramData\npm”

Run the command “npm install karma-cli -g” and verify that i is installed in  “C:\ProgramData\npm”

Install PhantomJs (Optional)

(phantomjs will be downloaded and installed in each build folder if it is not found locally)
Download the zip-file for Windows http://phantomjs.org/download.html
and extract to “C:\PhantomJs\bin\phantomjs” (create the path)

For npm to find phantomjs in a TeamCity build step,
add the path “C:\PhantomJs\bin\phantomjs\bin\phantomjs.exe” to a new environment variable PHANTOMJS_BIN (created in “Environment variables” )

Restart the TeamCity service just to be sure.
To run the karma tests

Save the TeamCity reporter in your project (read this http://karma-runner.github.io/0.13/plus/teamcity.html)
by running the command “npm i –save-dev karma-teamcity-reporter”

Add two command line build steps to your build.
first one containing the command “npm install” – to update/install your “node_modules”
and the second containing the command “karma start –reporters teamcity –single-run –browsers PhantomJS –colors false”

And now you should have a great karma 😉

Happy building!
//Jimi
How to use Visual Studio 2015 with latest nodejs npm

Problem – Visual Studio uses an old version of npm

When running “npm install” using npm version 2 (npm2) the node_modules dependency graph can (will) cause the path/file tree to grow beyond the path length allowed in Windows.
One example of error messages that can hit you in VS is from the RazorGenerator.MSBuild “Illegal characters in path.”
I found that updating this from 2.2.6 to the latest 2.4.3 solved the particular problem in one project but lead to other problems in another project where other nuget packages needed to be updated due to the update of RazorGenerator.MSBuild

Solution – install the latest version of npm and make Visual Studio use it

node version 3 (npm3) has solved the problem with deep paths, https://docs.npmjs.com/how-npm-works/npm3, and therefore the simplest solution is to use this version in VS, I do not know why VS has not updated to this version but since it is a Windows developer tool aiming hard on the open source arena I am stumbled on why an important “fix” like this is not packaged in an update already.

How to

Install nodejs for windows

Using the latest installer from here https://nodejs.org/en/download/, it is as simple as point and click 🙂

Upgrade npm to latest version

At the time of writing the nodejs installer uses an older npm version and that´s why you should update npm by using “npm-windows-upgrade” (more information can be found here https://www.npmjs.com/package/npm-windows-upgrade)

The short install instruction is
Start powershell as administrator
Run the command “Get-ExecutionPolicy” – to see what your base line setting is (probably Restricted)
Run the command “Set-ExecutionPolicy Unrestricted -Scope CurrentUser -Force” – to allow the upgrade
Run the command “npm install –global –production npm-windows-upgrade” to install the upgrader
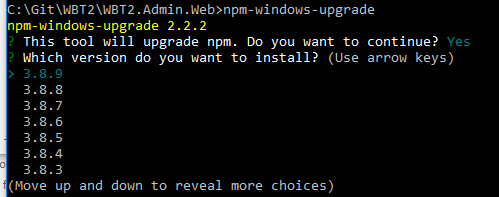
Run the command “npm-windows-upgrade” to upgrade
and select the latest version by just hitting enter.

npm-windows-upgrade

And optionally run the command “Set-ExecutionPolicy Restricted -Scope CurrentUser -Force” – to set the policy back to the former setting, using the value from the first “Get-ExecutionPolicy” (probably Restricted).

Point Visual Studio to the latest npm version

Add the nodejs path to Visual Studio to use the latest npm (thanks to mr James for pointing it out, http://jameschambers.com/2015/09/upgrading-npm-in-visual-studio-2015/)

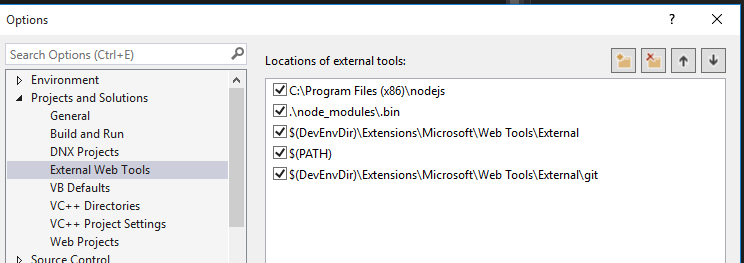
In Visual Studio quick search find “External Web Tools”
and Add a new tools location path where the path points to the nodejs folder from the first step, “C:\Program Files\nodejs” or “C:\Program Files (x86)\nodejs” unless you made any changes, and move the location to the top.

VS-ExternalWebTools

Restart VS (not sure if it is needed but it´s probably best anyway)

If you have a project with a current node_modules folder created before the npm upgrade, then delete the node_modules folder before you open the project in VS to avoid annoying errors.

And now the VS build should work.
If you already had a node_modules folder you can see that the new folder has a lot more sub folders, because more of the dependencies are installed in the “root” now.

Happy coding!
//Jimi