Eset Remote Administration Console – Nod32

How to disable Password Protection in Nod32 antivirus.

To update a setting in Nod32 the setting must be enabled in the policy, if you just disable a setting in the policy it will not change the setting on the clients.

If Password protection is enabled in Nod32 you will not be able to uninstall it from a logon script

Procedure to disable password protection is as follows

  1. In admin console open up the policy manager from Tools menu
  2. Pick the policy to edit and press edit
  3. Mark “Eset Smart Security…” > ESET Kernel > Setup > Protect setup parameters
  4. Chose “Unmark” to disable the setting
  5. Chose “Mark” to enable the setting, but do NOT enter a password
  6. Save the policy

That´s it.


How to Enable Remote Connection / Remote Access on MSSQL / SQL Server 2008 Express

If you cannot login to a remote servers database but the login is working from the localhost, and the port is open in Windows firewall, then you probably have to enable the remote connection in SQL Server Configuration Manager.

Since I found a great article about this subject I wont write it myself. A great guide is in the other end of this link http://www.linglom.com/2009/03/28/enable-remote-connection-on-sql-server-2008-express/


How to recover and reset a MSSQL SA password – Forgotten SA password or disabled SA user

How to recover the SA password in MSSQL 2008

Have you forgotten the SA (system administrator) password of your MSSQL installation? Can you not login using the Windows administrator account? Relax and do not panic! Here are some of the solutions 🙂

First you should try to login to the server as a domain admin or a local admin and connect to the database with SQL Server Management Studio (SSMA) using Windows Authentication. If this is not working then just continue reading.

If you (or someone else) have disabled the possibility of logging in as a local or domain admin (which is a part of best practice) you will have to enable an SA account, or reset the password of it.

You can enable accounts, reset passwords and add new sysadmin accounts in SQL Server 2005 and SQL Server 2008, the only catch is that you have to do it in the single user mode which means that if it is used in production you have to do it when the database can be down for about 10 minutes.

Note: If the database is used in a production environment I recommend that you do NOT change the password of the SA account unless you are totally sure that no applications are running the database using the SA account. It´s better to add a new account with sysadmin privileges if you don’t want to take the risk.

Follow these steps to add a new sysadmin account in SQL Server 2008 express.

1. Logon to the server with Windows domain or local administrator account.

2. Start the command prompt, using “Run as Administrator” if the server is also Windows 2008, or Windows 7

3. Stop the SQL Server either using the SQL Server Configuration Manager or by running the command:
NET STOP “SQL SERVER (SQLEXPRESS)”             And wait till the service is stopped

4. Start the SQL Server in single user mode by running the command*:
NET START “SQL SERVER (SQLEXPRESS)” /m

5. Start SSMA, using “Run as Administrator” if the server is also Windows 2008, or Windows 7

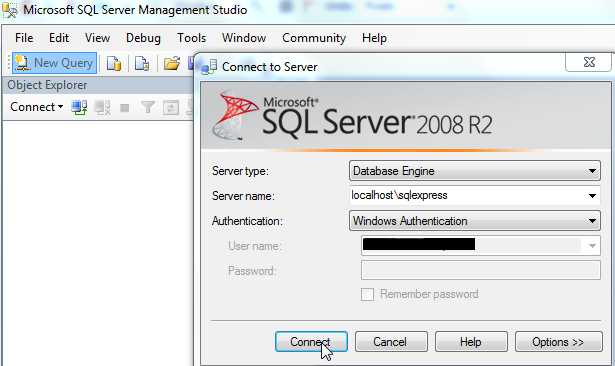
6. In SSMA click the “New Query” button and login to the instance localhostsqlexpress with “Windows Authentication”.
 

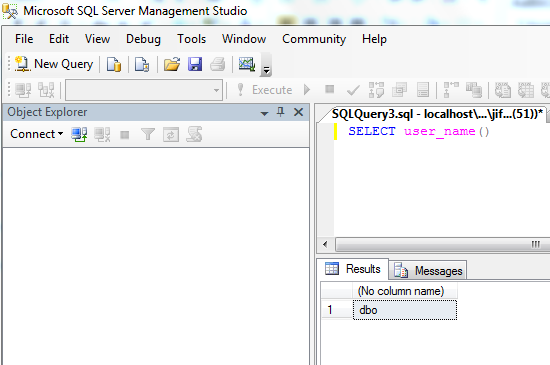
7. In the new query window you run the following command to check the privilege of logged on user:
SELECT user_name()
–the result should be “dbo” which means you are logged in as a sysadmin


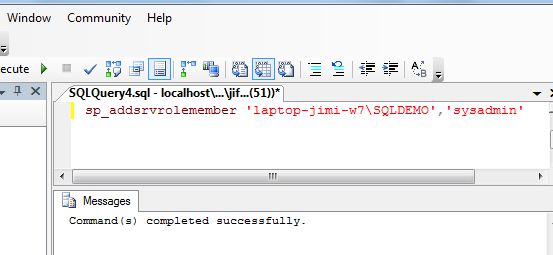
8. Comment out the previous command or delete it, then run the following command if in a domain:

sp_addsrvrolemember ‘domainname\username’,’sysadmin’
— where domainname is the domain you are in.

Example of user jimi in the newsweb domain:
sp_addsrvrolemember ‘newsweb\jimi’,’sysadmin’

If the account is local then change the domainname to the servername  like in this example:
sp_addsrvrolemember
‘laptop-jimi-w7\jimi’,’sysadmin’


9. Stop the SQL Server, either using the SQL Server Configuration Manager or by running the command:
NET STOP “SQL SERVER (SQLEXPRESS)”         And wait till the service is stopped

10. Start the SQL Server, either using the SQL Server Configuration Manager or by running the command:
NET START “SQL SERVER (SQLEXPRESS)”     And wait till the service is started

11. Now you should be able to login with the newly added account in SSMS and from there you can add, remove and reset accounts when the database is online.


*NET commands used to start and stop the sql service depend on the installation.

To start a named instance you can run one of the following command lines (and this is how we do it on the sql express 2008):
NET START “SQL Server (instanceName)”    
NET START MSSQL$instanceName

To start a default instance you can run: NET START MSSQLSERVER

Outlook Anywhere

Outlook 2007 outside the office (RPC over HTTP)

How to set up Outlook to work outside the office with no need for a VPN connection.

This will only work if your Mail administrator has configured the mailserver correctly.
If you are an administrator read my article Outlook Anywhere settings from GPO to learn how to enable these settings via GPO.

I usually send my own version of this HowTo to users I am administering (when the GPO settings is not an option), because then I can show them exactly how to do it with the correct values (it is easy to get confused when you don’t work with IT).

But for you I think these guides from Microsoft will be better.

English: http://office.microsoft.com/en-us/outlook/HP101024441033.aspx?pid=CH101395531033
If the link doesn’t work, google for “Use Outlook Anywhere to connect to your Exchange server without VPN”

Swedish: http://office.microsoft.com/sv-se/outlook/HP101024441053.aspx
Om länken inte fungerar sĂĄ googla efter “Använda funktionen Outlook överallt för att ansluta till din Exchange-server utan ett VPN”

Make sure that Group Policies can be updated over VPN

To make sure* that GPO´s are updated even for users that are connected over VPN you can disable the “Group Policy slow link detection”

GPO settings

In “User Configuration / Administrative Templates / System / Group Policy” **

open up the “Group Policy slow link detection”,

enable it and set the “Connections speed” to 0 (null). This  disables the slow link detection.

* For some GPO settings to update on a computer or a user (depending on what type of settings are used) the connection to the domain controller must be established before the computer boots or before the user are logged on to the computer.

** If the settings are Computer based then edit the  “Computer Configuration / Administrative Templates / System / Group Policy”, “Group Policy slow link detection”.

Outlook Anywhere settings from GPO

If you want to make sure all of your employees (ok, maybe not yours but you get it) have the right settings in their Outlook profile so that they can always use the mail client even when they are outside of the office, you should push these settings from a GPO.

Download Template

Download this file http://download.microsoft.com/download/F/B/C/FBC43645-89EA-4FB4-828C-DFE27C360233/article-961112.adm

Save the file temporary to your desktop or directly to %WinDir%inf

Set up the GPO

Open the GPMC and create a new group policy with an easy to understand name like “Outlook 2007 Anywhere”

Edit the GPO

Add the template to the “Outlook 2007 Anywhere” GPO

  1. Right click on “Administrative Templates” under User Configuration and chose “Add/remove Templates” from the drop down menu.
  2. Click “Add”

    and select the file named “article-961112.adm” (if you saved the file to the desktop just drag it in to this window) and Click “Open”
  3. Now that the template is added click “Close”

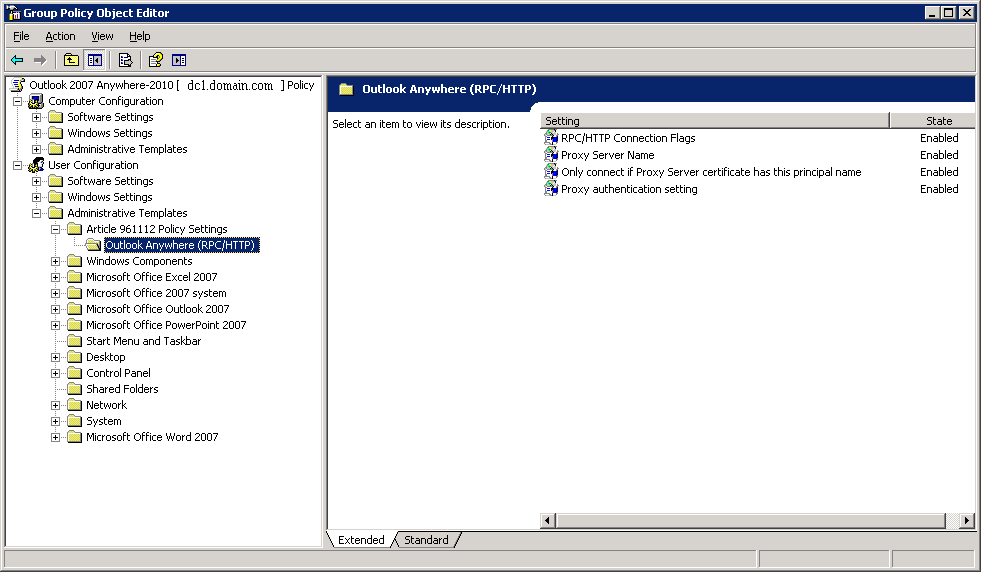
Configure the Outlook Anywhere template

Now open the added template and change the configuration to meet your needs.

  1. RPC/HTTP Connection Flags
    Enable the setting and pick the flags you need
    Flag1: Enables the ‘Connect to Microsoft Exchange using HTTP checkbox’ on the Connection tab.
    Flag2: Enables the ‘Connect using SSL only’ checkbox
    Flag3: Enables the ‘Only connect to proxy servers that have this principal name in their certificate’ checkbox
    Flag4: Enables the ‘On fast networks, connect using HTTP first, then connect using TCP/IP’ checkbox
    Flag5: is not implemented as an option in Outlook 2007 so it is not included in any policy settings.
    Flag6: Enables the ‘On slow networks, connect using HTTP first, then connect using TCP/IP’ checkbox
  2. Proxy Server Name
    Enable the setting and specify the server name, this should be your DNS MX record.
  3. Only connect if Proxy Server certificate has principal name
    Enable the setting and enter your certificates common name, if you have a wildcard certificate it will look like on the image but if you have a single server certificate it is probably the same as the DNS MX record.
  4. Proxy authentication setting
    Enable the setting and choose authentication type. This should be set to “NTLM authentiction”.

Now all you have to do is to link the GPO to the domain and wait for the replication and policy update times.
If you have users that are connected to the domain via VPN make sure that the GPO “Slow link detection” is configured to your meet needs.